作为一名开发者,往往需要编写程序的 API 文档,尤其是 Web 后端开发者,在跟前端对接 HTTP 接口的时候,一个好的 API 文档能够大大提高协作效率,降低沟通成本,本文就来聊聊如何使用 OpenAPI 构建 HTTP 接口文档。
OpenAPI
什么是 OpenAPI
OpenAPI规范
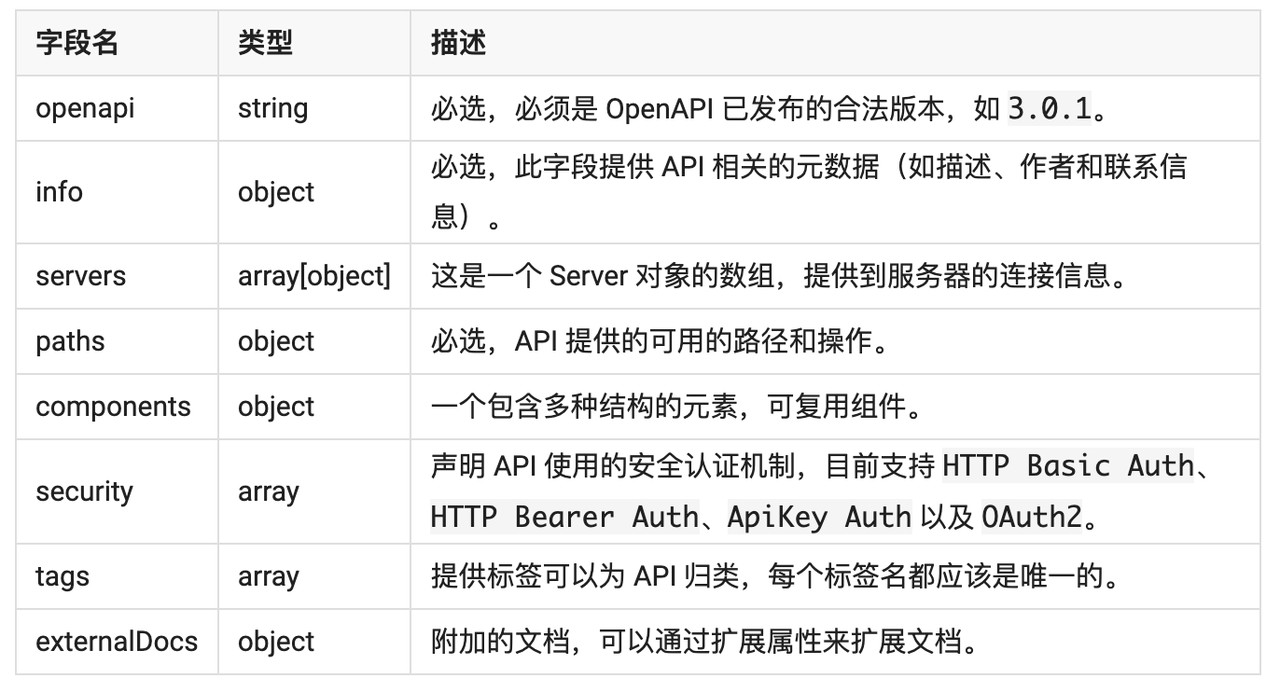
openapi: 3.1.0info: title: Tic Tac Toe description: | This API allows writing down marks on a Tic Tac Toe board and requesting the state of the board or of individual squares. version: 1.0.0 # 此为 API 接口文档版本,与 openapi 版本无关tags: - name: Gameplaypaths: # Whole board operations /board: get: summary: Get the whole board description: Retrieves the current state of the board and the winner. tags: - Gameplay operationId: get-board responses: "200": description: "OK" content: application/json: schema: $ref: "#/components/schemas/status" # Single square operations /board/{row}/{column}: parameters: - $ref: "#/components/parameters/rowParam" - $ref: "#/components/parameters/columnParam" get: summary: Get a single board square description: Retrieves the requested square. tags: - Gameplay operationId: get-square responses: "200": description: "OK" content: application/json: schema: $ref: "#/components/schemas/mark" "400": description: The provided parameters are incorrect content: text/html: schema: $ref: "#/components/schemas/errorMessage" example: "Illegal coordinates"...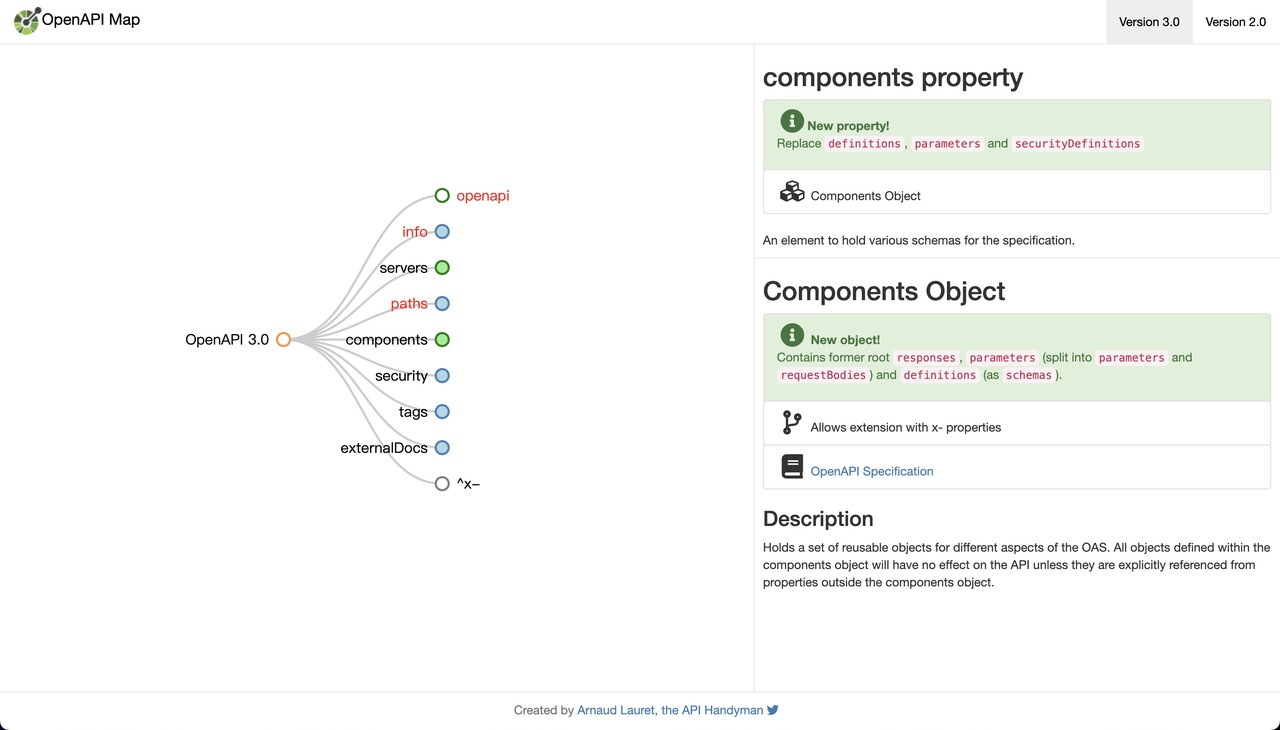
OpenAPI.Tools
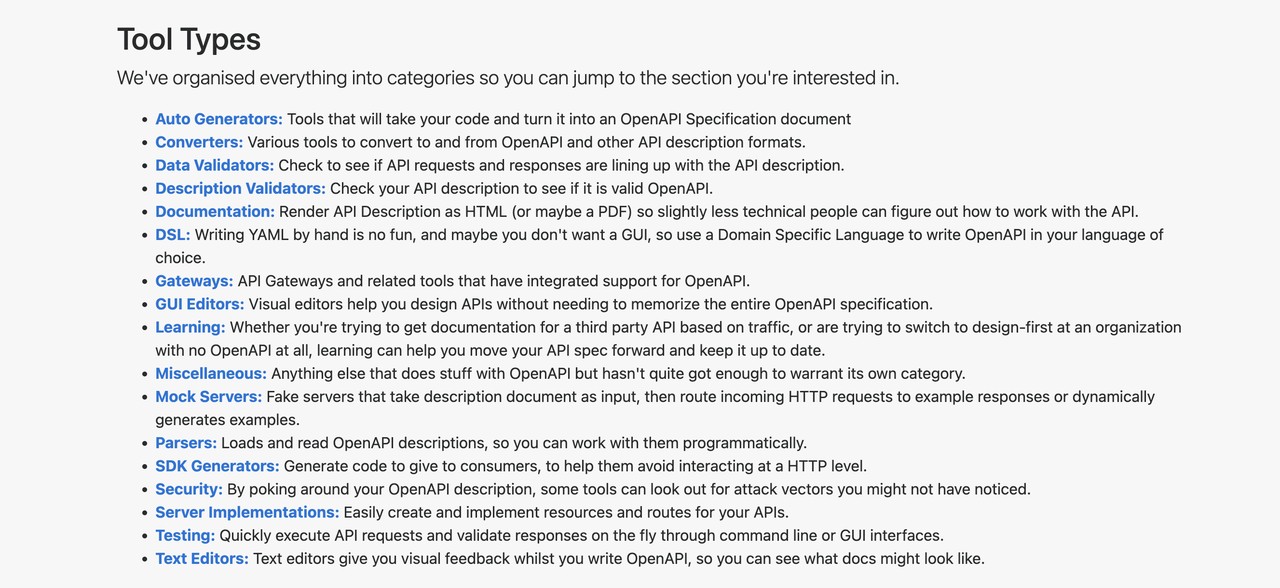
文档编辑器
Mock 服务器
代码生成器
Swagger
Swagger是什么
Swagger Codegen:根据 OpenAPI 规范定义生成服务器存根和客户端 SDK。
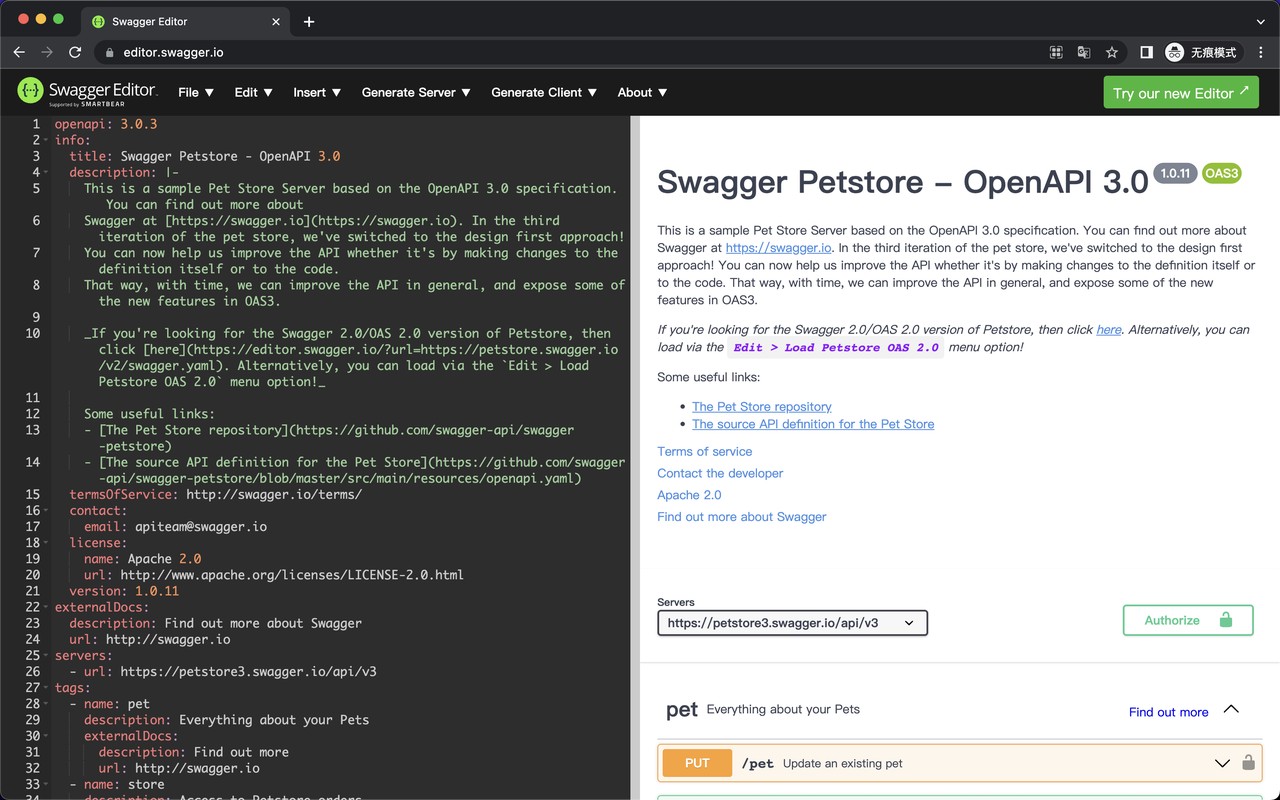
Swagger Editor:基于浏览器的在线 OpenAPI 规范编辑器。
Swagger UI:以 UI 界面的方式可视化展示 OpenAPI 规范定义,并且能够在浏览器中进行交互。
Swagger和OpenAPI的关系
OpenAPI 在实际开发的应用
用Swag生成Swagger文档
注意:在这里我一直提到的都是生成 Swagger 文档,而没有说是 OpenAPI 文档。因为无论是 swag 还是功能更强大的 go-swagger,它们目前都仅支持生成 OpenAPI 2.0 文档,并不支持生成 OpenAPI 3.0+ 文档,而 OpenAPI 2.0 版本我们更习惯称其为 Swagger 文档。
安装 Swag
$ go install github.com/swaggo/swag/cmd/swag@latest # 安装$ swag --version # 查看版本swag version v1.8.10
Swag 命令行工具
在包含 main.go 文件(默认情况下)的项目根目录运行 swag init 命令,将会解析 swag 注释并生成 docs/ 目录以及 /docs/docs.go、docs/swagger.json、docs/swagger.yaml 三个文件。
$ swag init -h # 查看 init 子命令使用方法NAME: swag init - Create docs.goUSAGE: swag init [command options] [arguments...]OPTIONS: --quiet, -q 不在控制台输出日志 (default: false) --generalInfo value, -g value API 通用信息所在的 Go 源文件路径,如果是相对路径则基于 API 解析目录 (default: "main.go") --dir value, -d value API 解析目录,多个目录可用逗号分隔 (default: "./") --exclude value 解析扫描时排除的目录,多个目录可用逗号分隔 --propertyStrategy value, -p value 结构体字段命名规则,三种:snake_case,camelCase,PascalCase (default: "camelCase") --output value, -o value 所有生成文件的输出目录(swagger.json, swagger.yaml and docs.go)(default:"./docs") --outputTypes value, --ot value 生成文件的输出类型(docs.go, swagger.json, swagger.yaml)三种:go,json,yaml (default: "go,json,yaml") --parseDependency, --pd 解析依赖目录中的 Go 文件 (default: false) --markdownFiles value, --md value 指定 API 的描述信息所使用的 Markdown 文件所在的目录,默认禁用 --parseInternal 解析 internal 包中的 Go 文件 (default: false) --generatedTime 输出时间戳到输出文件 `docs.go` 顶部 (default: false) --parseDepth value 依赖项解析深度 (default: 100) --requiredByDefault 默认情况下,为所有字段设置 `required` 验证 (default: false) --instanceName value 设置文档实例名 (default: "swagger") --parseGoList 通过 'go list' 解析依赖关系 (default: true) --tags value, -t value 逗号分隔的标签列表,用于过滤指定标签生成 API 文档。特殊情况下,如果标签前缀是 '!' 字符,那么带有该标记的 API 将被排除 --help, -h 显示帮助信息 (default: false)
注意:以上 swag init 命令可选参数介绍略有删减,只列出了常用选项,更完整的文档请参考官方 GitHub 仓库。
swag fmt 命令可以格式化 swag 注释。
$ swag fmt -h # 查看 fmt 子命令使用方法NAME:swag fmt - format swag commentsUSAGE:swag fmt [command options] [arguments...]OPTIONS:--dir value, -d value API 解析目录,多个目录可用逗号分隔 (default: "./")--exclude value 解析扫描时排除的目录,多个目录可用逗号分隔--generalInfo value, -g value API 通用信息所在的 Go 源文件路径,如果是相对路径则基于 API 解析目录 (default: "main.go")--help, -h 显示帮助信息 (default: false)
在 Gin 中使用 Swag
.├── go.mod├── go.sum└── main.go
$ go mod init gin-swag
package mainimport ("net/http""github.com/gin-gonic/gin")// @title Swagger Example API// @version 1.0// @schemes http// @host localhost:8080// @BasePath /api/v1// @tag.name example// @tag.description 示例接口// Helloworld godoc//// @Summary 该操作的简短摘要// @Description 操作行为的详细说明// @Tags example// @Accept json// @Produce json// @Success 200 {string} string "Hello World!"// @Router /example/helloworld [get]func Helloworld(g *gin.Context) {g.JSON(http.StatusOK, "Hello World!")}func main() {r := gin.Default()v1 := r.Group("/api/v1"){eg := v1.Group("/example"){eg.GET("/helloworld", Helloworld)}}if err := r.Run(":8080"); err != nil {panic(err)}}
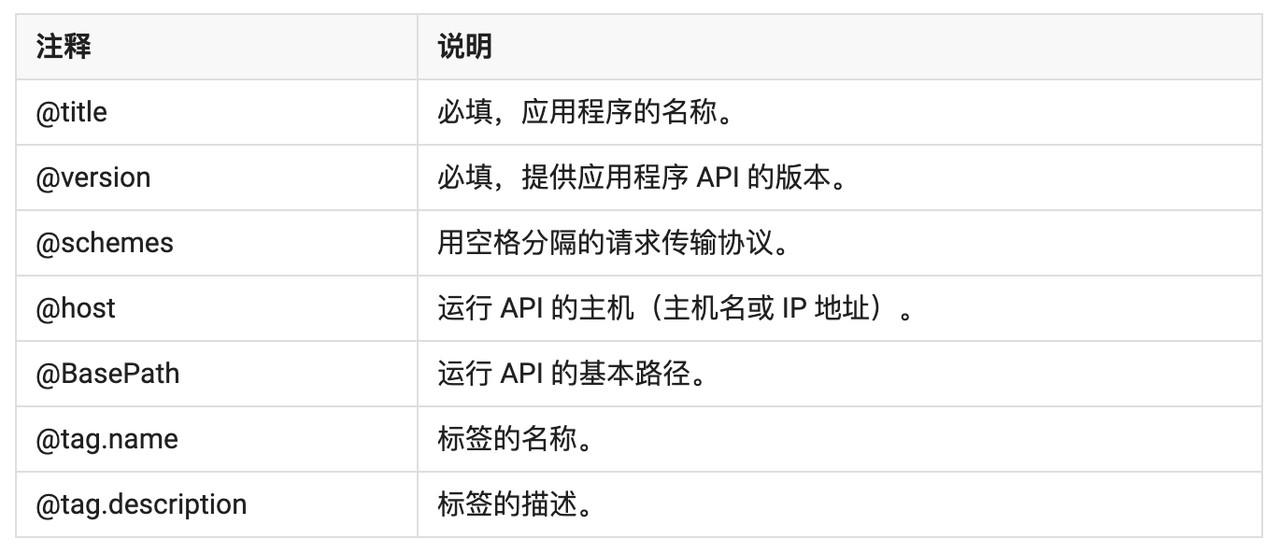
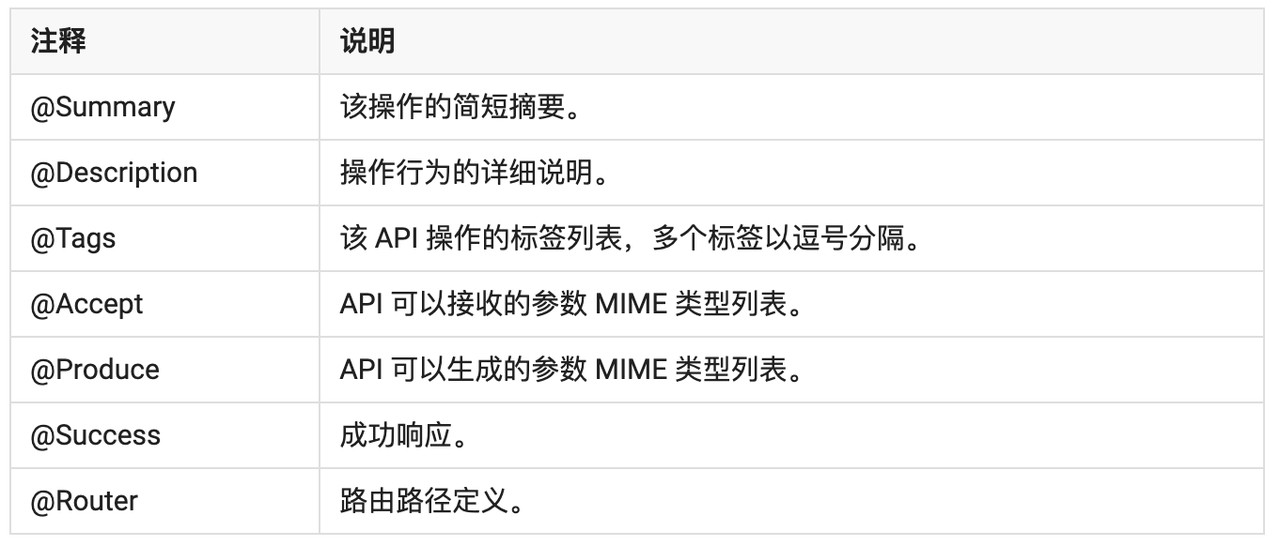
.├── docs│ ├── docs.go│ ├── swagger.json│ └── swagger.yaml├── go.mod├── go.sum└── main.go
basePath: /api/v1host: localhost:8080info: contact: {} title: Swagger Example API version: "1.0"paths: /example/helloworld: get: consumes: - application/json description: 操作行为的详细说明 produces: - application/json responses: "200": description: Hello World! schema: type: string summary: 该操作的简短摘要 tags: - exampleschemes:- httpswagger: "2.0"tags:- description: 示例接口 name: example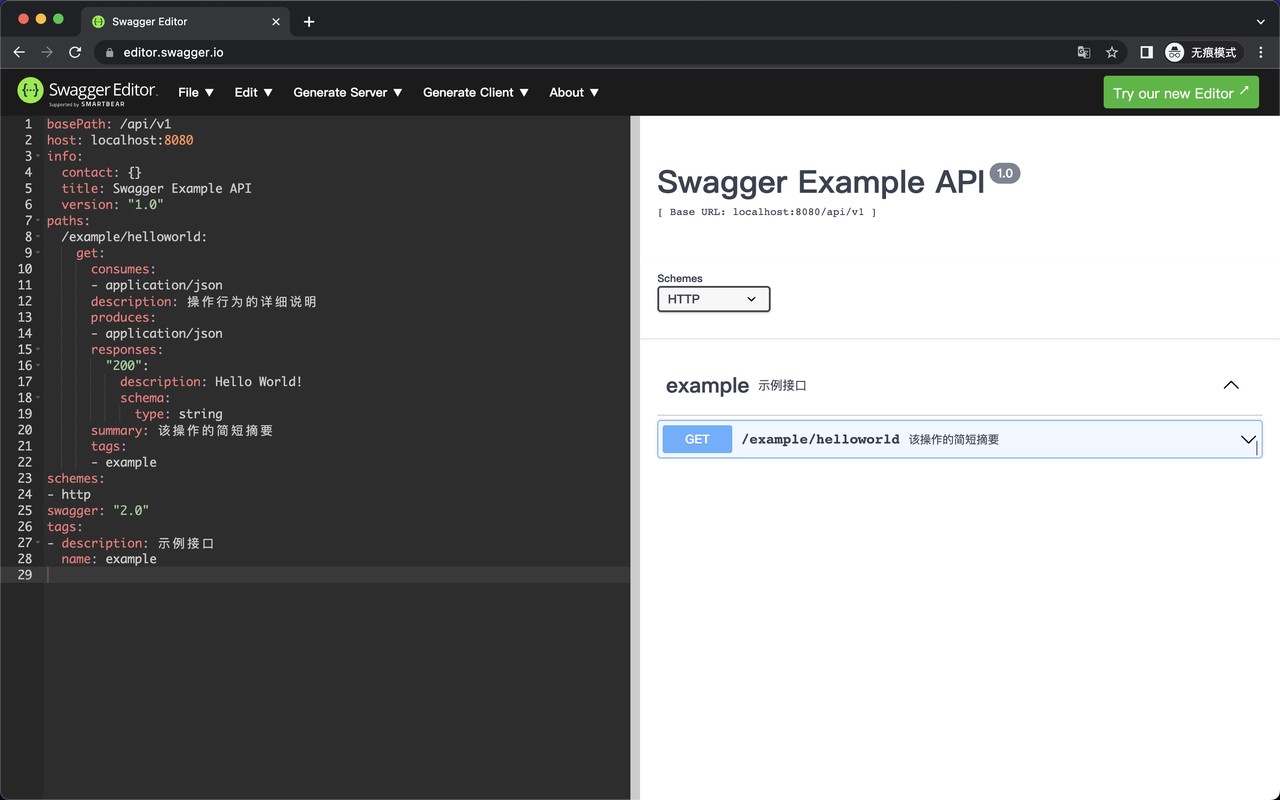
将 Gin 作为 Swagger UI 服务器
$ go get -u github.com/swaggo/gin-swagger$ go get -u github.com/swaggo/files
import "github.com/swaggo/gin-swagger" // gin-swagger middlewareimport "github.com/swaggo/files" // swagger embed files
r.GET("/swagger/*any", ginSwagger.WrapHandler(swaggerFiles.Handler))package mainimport ( "net/http" "github.com/gin-gonic/gin" swaggerFiles "github.com/swaggo/files" ginSwagger "github.com/swaggo/gin-swagger" "gin-swag/docs" // 当前包名为 gin-swag)// @title Swagger Example API// @version 1.0// @schemes http// @host localhost:8080// @BasePath /api/v1// @tag.name example// @tag.description 示例接口// Helloworld godoc//// @Summary 该操作的简短摘要// @Description 操作行为的详细说明// @Tags example// @Accept json// @Produce json// @Success 200 {string} string "Hello World!"// @Router /example/helloworld [get]func Helloworld(g *gin.Context) { g.JSON(http.StatusOK, "Hello World!")}func main() { // 会覆盖上面注释部分 title 属性的设置 docs.SwaggerInfo.Title = "Swag Example API" r := gin.Default() v1 := r.Group("/api/v1") { eg := v1.Group("/example") { eg.GET("/helloworld", Helloworld) } } // Swagger 文档接口地址 r.GET("/swagger/*any", ginSwagger.WrapHandler(swaggerFiles.Handler)) if err := r.Run(":8080"); err != nil { panic(err) }}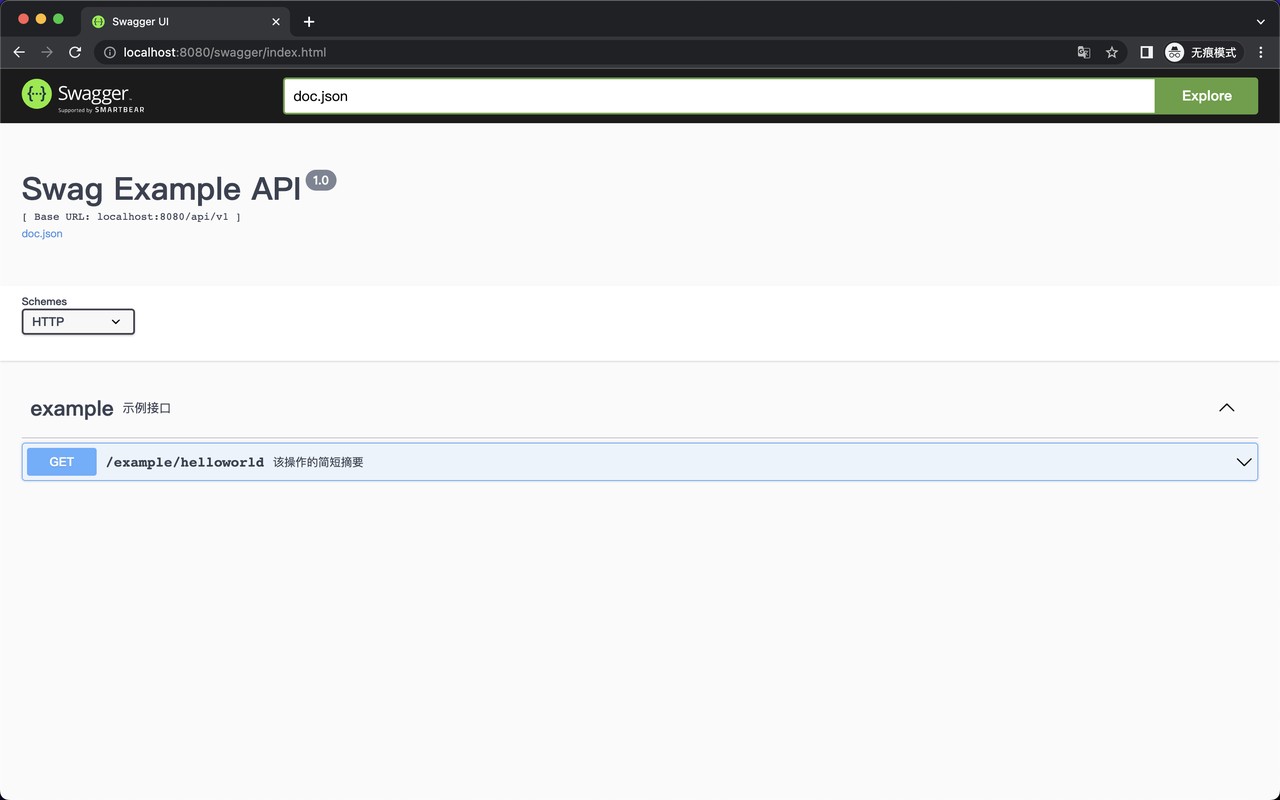
让 Swag 支持多版本 API 文档
swag init -g internal/api/controller/v1/docs.go --exclude internal/api/controller/v2 --instanceName v1swag init -g internal/api/controller/v2/docs.go --exclude internal/api/controller/v1 --instanceName v2
其中 -g 参数指明 API 通用注释信息所在的 Go 源文件路径,大型项目中为了保持代码架构整洁,这些注释应该独立于一个文件,而不是直接写在 main.go 中。
--exclude 参数指明生成 Swagger 文档时,需要排除的目录。可以发现,在生成 v1 版本接口文档时,我排除了 v2 接口目录,在生成 v2 版本接口文档时,排除了 v1 接口目录,这样就实现了多版本接口分离。
关于这个项目的更多细节就留给你自己去探索了,相信你阅读完代码后会有所收获。
Swag 使用建议
在前文介绍的 swag 使用流程中,不知道你有没有注意到,我们是先编写的代码,然后再生成的 Swagger 文档,最后将这份文档交给前端使用。
这显然违背了「文档先行」的思想,实际工作中,我们更多的时候是先跟前端约定好接口,然后后端提供 Swagger 文档供前端使用,最后才是前后端编码阶段。
要想解决这个问题,最直接的解决方案是不使用 swag 工具,而是直接使用 Swagger Editor 这种编辑器手写 Swagger 文档,这样就能实现文档先行了。
但这又违背了 OpenAPI 给出的「最佳实践」,推荐自动生成 Swagger 文档,而非手动编写。
我自己的解决方案是,依旧选择使用 swag 工具,不过在编写代码时,先写接口的框架代码,而不写具体的业务逻辑,这样就能够先通过接口注释生成 Swagger 文档,供前端使用,然后再编写业务代码。
另外,较为遗憾的是,目前 swag 生成的文档是 OpenAPI 2.0 版本,并不能直接生成 OpenAPI 3.0 版本,如果你想使用 OpenAPI 3.0 版本的文档,一个变通的方法是使用工具将 OpenAPI 2.0 文档转换成 OpenAPI 3.0,如前文提到的 Swagger Editor 就支持此操作。
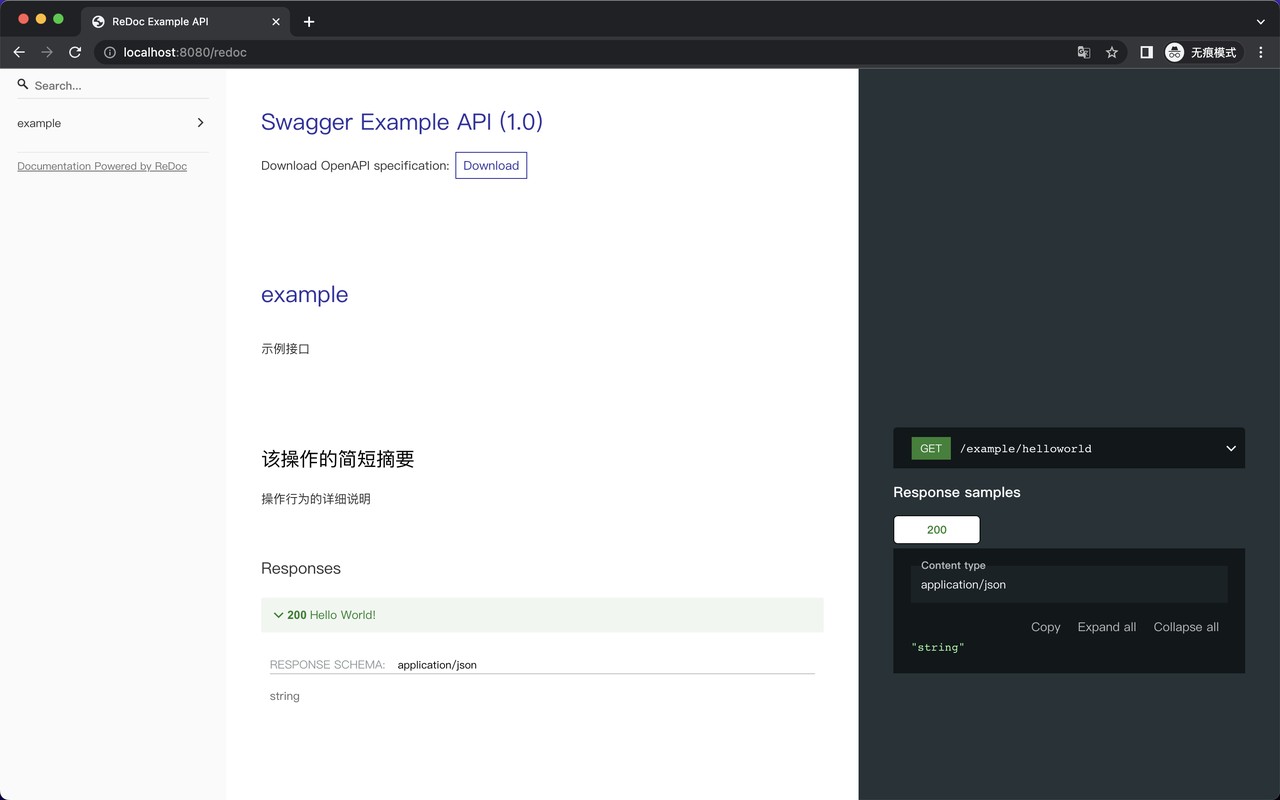
使用ReDoc风格的API文档
在 gin 中使用 go-redoc 非常简单,只需要将如下套路代码加入到我们的 main.go 文件中即可。
import ("github.com/gin-gonic/gin""github.com/mvrilo/go-redoc"ginRedoc "github.com/mvrilo/go-redoc/gin")...doc := redoc.Redoc{Title: "Example API",Description: "Example API Description",SpecFile: "./openapi.json", // "./openapi.yaml"SpecPath: "/openapi.json", // "/openapi.yaml"DocsPath: "/docs",}r := gin.New()r.Use(ginRedoc.New(doc))
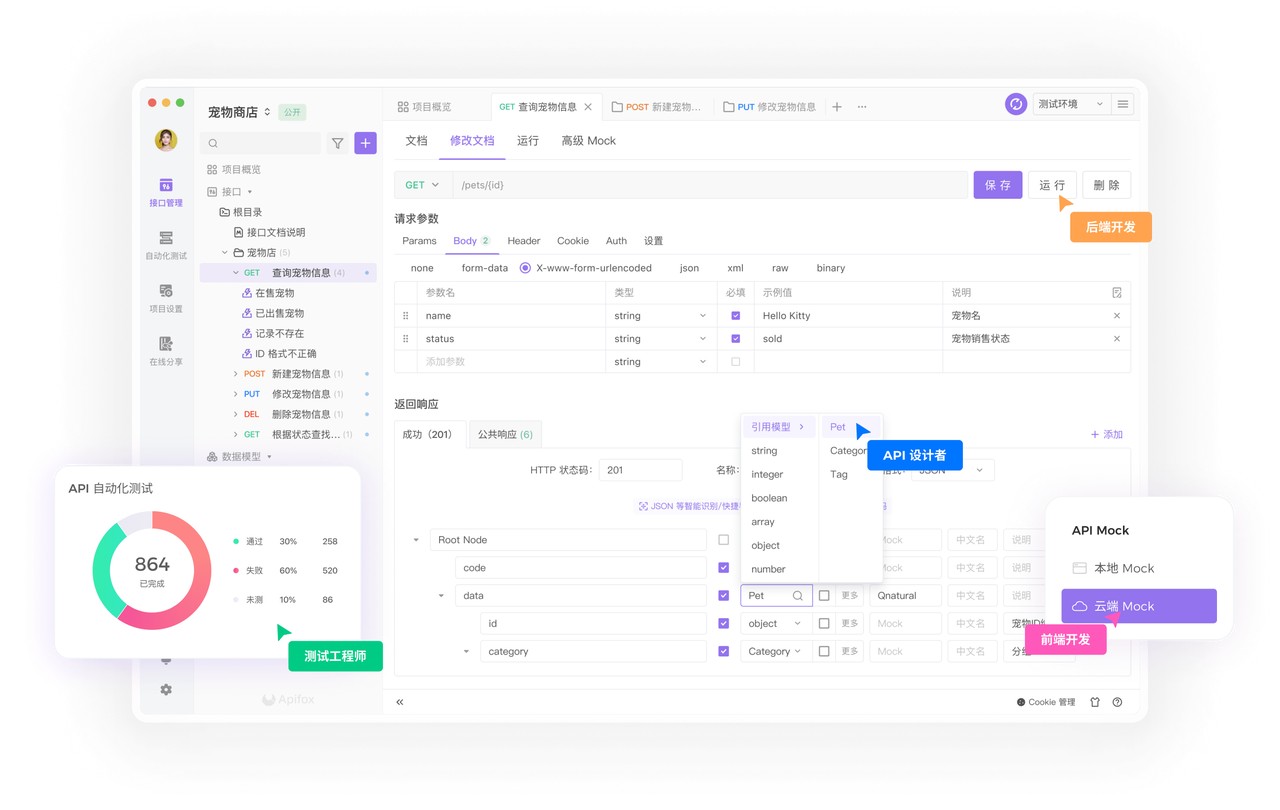
更先进的API工具推荐
OpenAPI 官网:https://www.openapis.org/ OpenAPI 入门:https://oai.github.io/Documentation/ OpenAPI 规范:https://spec.openapis.org/oas/latest.html OpenAPI 规范中文版:https://openapi.apifox.cn/ OpenAPI 规范思维导图版:https://openapi-map.apihandyman.io/ OpenAPI.Tools:https://openapi.tools/ Swagger 官网:https://swagger.io/ swag:https://github.com/swaggo/swag swag-example:https://github.com/jianghushinian/swag-example go-redoc:https://github.com/mvrilo/go-redoc Apifox 官网:https://www.apifox.com/
